Creating Local Answer Keys

You currently have three options when it comes to creating your own answer key. It all starts with clicking on <+ADD> in the KEYS menu of the particular test type you want to add to.

You then see the three options for creating a new key.
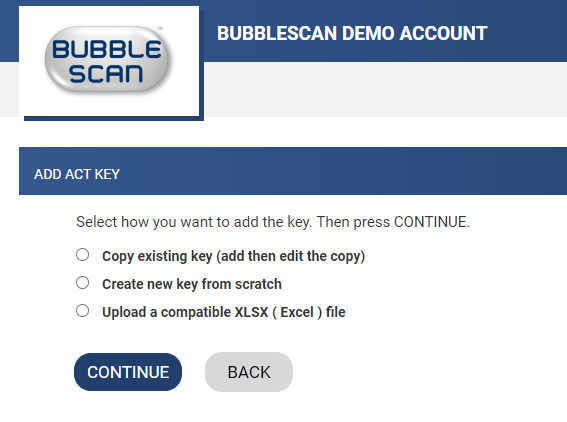
We will very soon be adding a fourth option for ACT, the ADD ACT KEY WIZARD, but I will create a separate post for that when it is actually available.

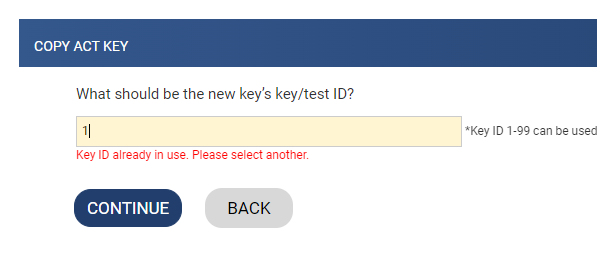
The easiest and recommended way to create a new key, is the first option, Copy existing key (and then edit the copy).  You will see a list of all active and inactive, local and system keys and simply pick the one you want to copy.

When assigning a new key ID, you have to pick one that does not belong to an ACTIVE key. For that reason it makes sense to deactivate system key #1 before you want to create your local copy using the same key ID.
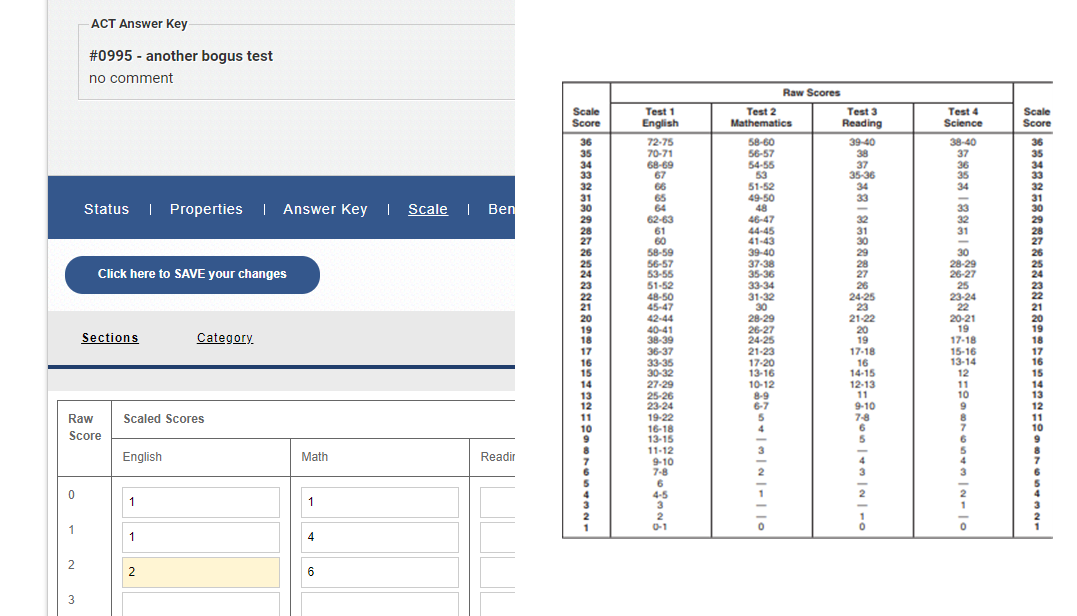
The second option is to create the key from scratch right through OnlineScoreTracker. The process is pretty straight forward, just tedious. It can get a little confusing when it comes to entering the scaled published by the test maker. OnlineScoreTracker’s format differs from the format you may see published by the test maker. We show the Raw Score on the far left and ask you to enter the Scale Score obtained, while the published scale usually does it just the other way around.
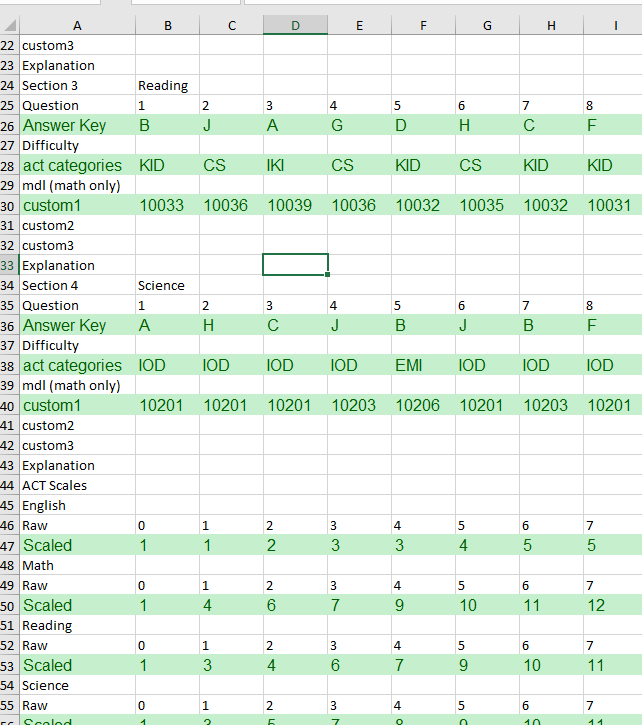
If you are good with Excel, then the third option to upload a compatible Excel file might be for you. We usually start by downloading an existing Excel file and then modifying it by replacing the key, categories, and scale. When using the Excel file, it is critical that fields remain exactly where they are and that you use the correct abbreviations for categories, hence the practice of modifying an existing Excel key.
By |2022-07-27T08:21:06-06:00July 27th, 2022|OnlineScoreTracker, Support, Tutorial|Comments Off on Creating Local Answer Keys

Control what scores student see in their portal

Control what scores students see in their portal

One of the main reasons for the student portal is so students can view their test scores. In the past, those scores were available in the Student Portal as soon as the tests were graded. We have now released a new feature that allows you to control what test scores and what section scores a student sees. Maybe you want to give the instructor first dibs on review the test before the student sees it? Maybe you want to wait until you can discuss a homework assignment together? Whatever your reason, now you can.

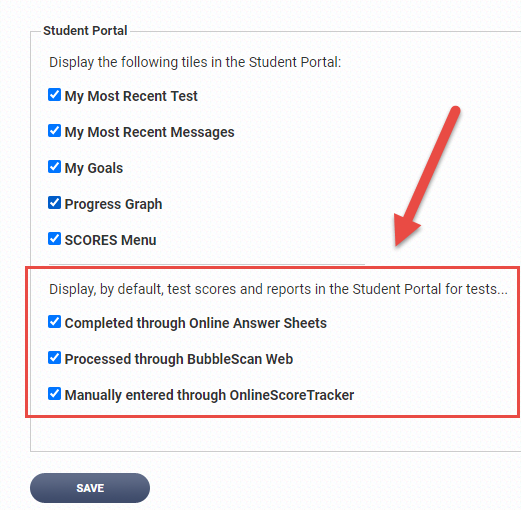
In Preferences – Web Panel under Student Portal, we’ve added a new option that lets you set the default behavior for the account. By default, these boxes are all checked, meaning that when a student completes an Online Answer Sheet, their test scores are immediately displayed in the Student Portal. If a scanned bubble sheet was graded because you processed it through BubbleScan Web, the scores are displayed in the Student Portal. And if you manually enter responses though OnlineScoreTracker, the scores are immediately visible in to the student.

If the boxes are unchecked then the test scores originating from one of these data entry methods are not visible in the Student Portal until an admin, supervisor, or instructor specifically releases them to be displayed there.

There are two places where scores can be released for display in the Student Portal.

The first place is the TESTS menu.

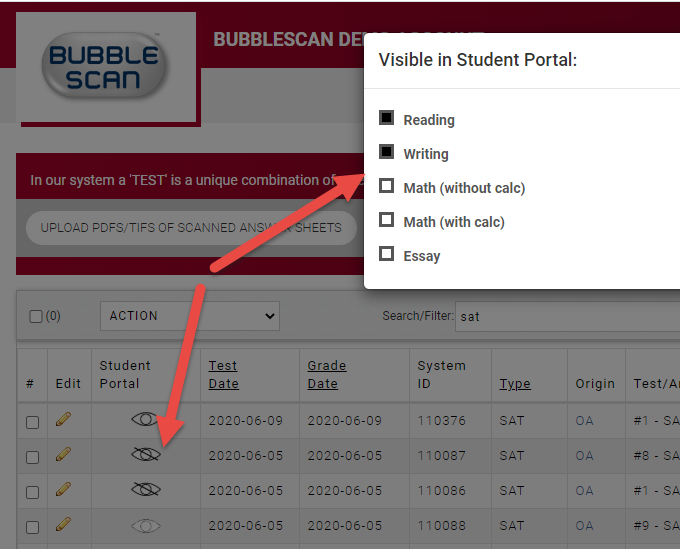
In a new column labeled “Student Portal” we have placed a visibility status icon. You can click on an icon to view what sections of that test are visible in the Student Portal.  As you have probably already guessed, a solid eye means all test sections are visible, including the full student report, a crossed-out eye means no scores are visible at all, and a gray or dotted-lined eye means some scores are visible to the student along with a preliminary/partial score report.

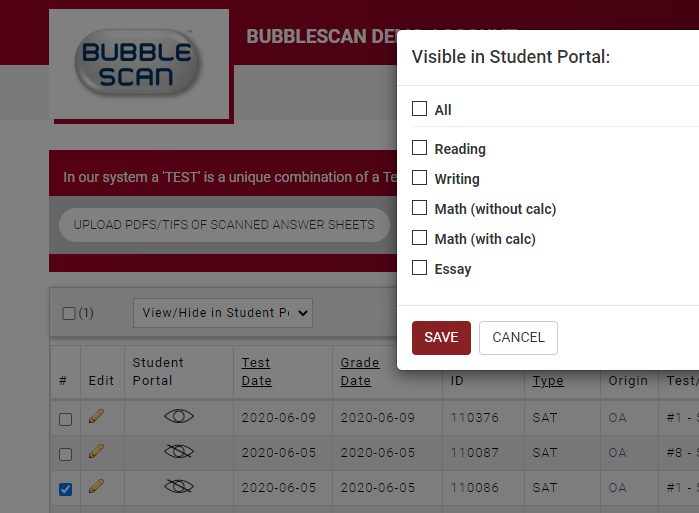
The status is changed by selecting one or more tests of the same test type and selecting “View/Hide in Student Portal” from the ACTION dropdown menu. The menu option will not be available when tests of different types (i.e. ACT and SAT) are selected.

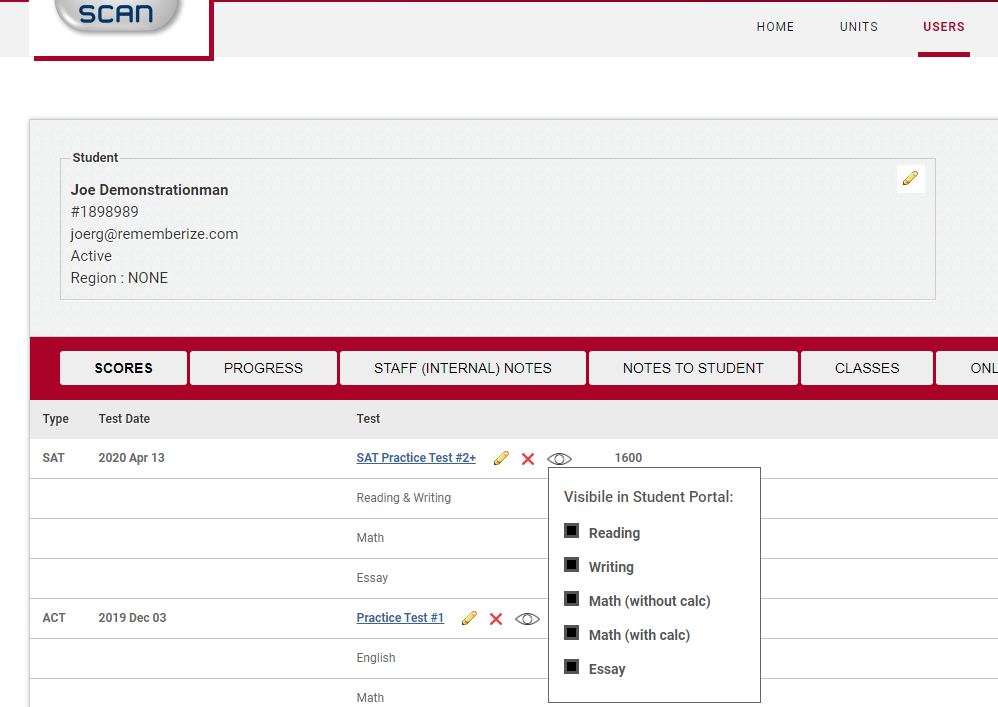
The other place is the the SCORES menu of a particular student.  Hovering over the “eye” icon shows what sections are visible, clicking on the icon allows you to edit the status for each section or for the entire test.

When all the sections of a test are visible to the student, we also display the full student report. We have several different versions for SAT and ACT, if you haven’t checked out the newer ones, maybe this is a good reminder to do just that.

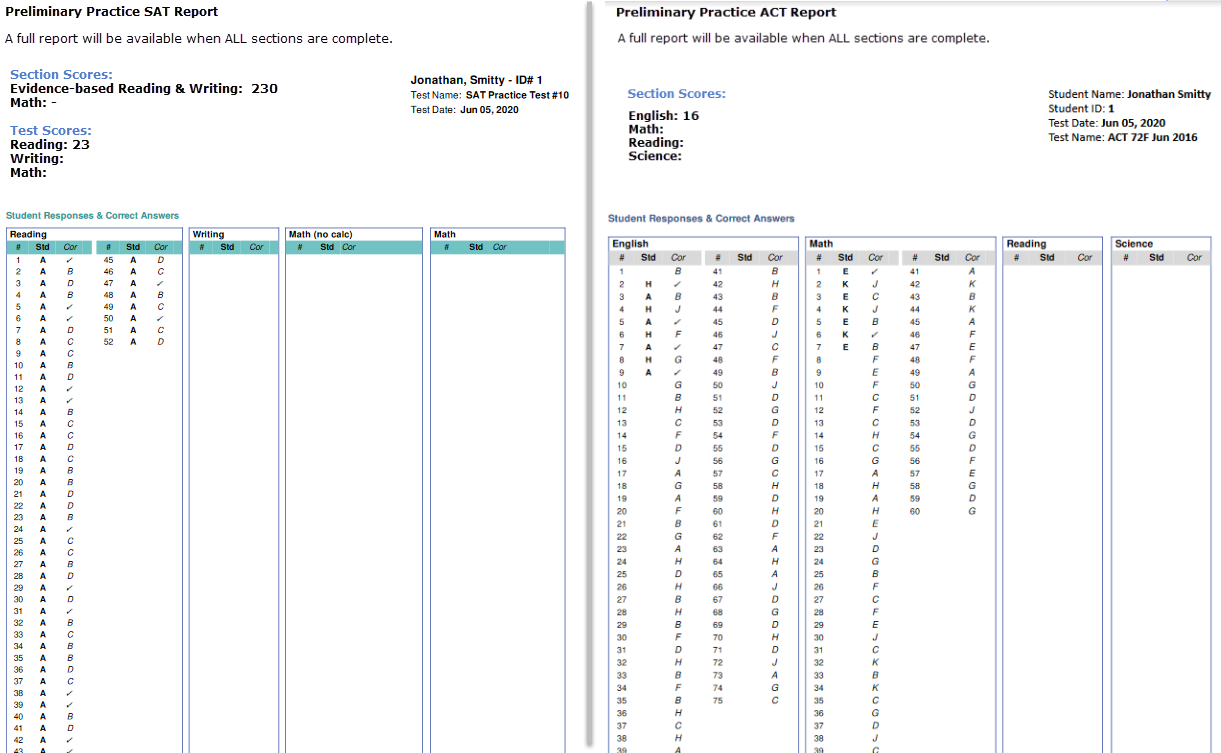
When not all the sections of a test are visible to the student, we are displaying a preliminary or partial, simplified test report that looks something like this:

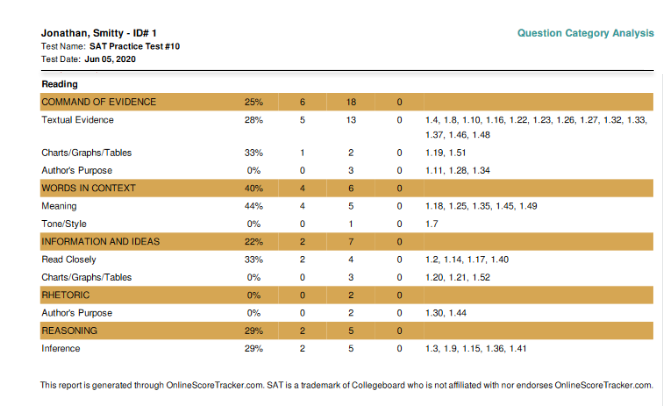
If your test has been mapped to test categories or skills, the respective sections will also be shown:

By |2020-06-09T13:42:23-06:00June 9th, 2020|BubbleScan, Tutorial|Comments Off on Control what scores student see in their portal

Creating Student Profiles

OnlineScoreTracker supports four ways to create new student accounts. This tutorial will address all four and also point out some ‘advanced’ features.

1. Manual
2. via CSV file
2. via API
2. by letting the student self-register

Manual

The easiest way to create a single student profile is to do it manually.

Click on USERS in the menu bar. The screen defaults to your list of STUDENTS.  Click on +ADD.

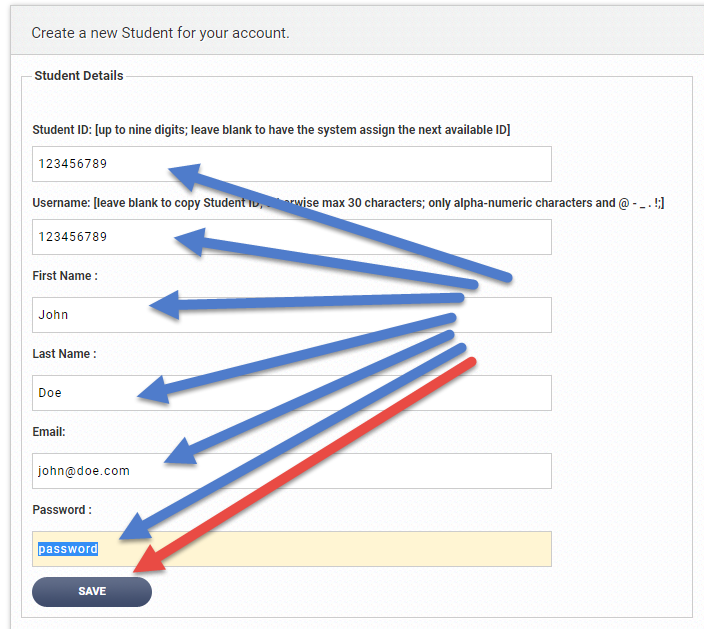
Then fill out the fields and click SAVE.

Advanced Tips:

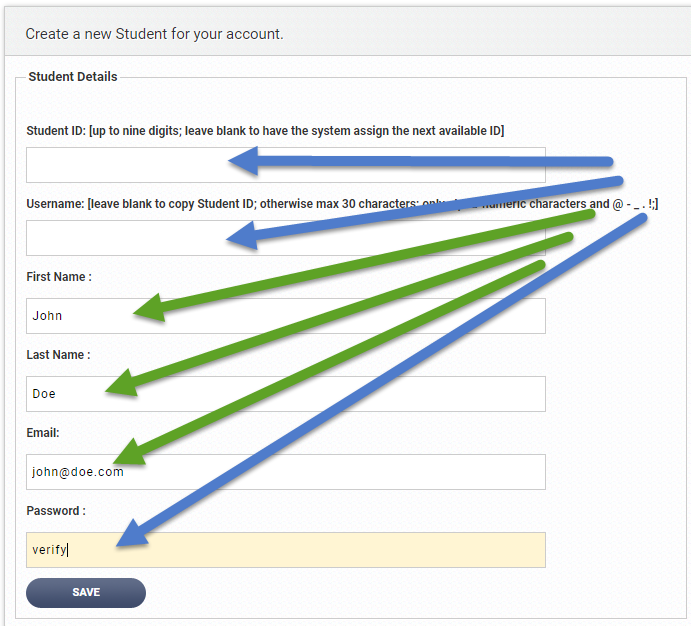
If you leave the Student ID field BLANK, OnlineScoreTracker will assign the first available ID starting with the value you set through Tools-Preferences-Creating Student Accounts:

If you leave the Username field BLANK, OnlineScoreTracker will use the Student ID as the Username. A student can log into their student portal using either the Student ID or the Username. When you grade paper&pencil based tests, the bubble sheet must contain the numeric Student ID.

If you specify a password of “verify”, OnlineScoreTracker will send an email to the student asking them set a password. Click here to read more about this process.

This means that the simplest, and from our point-of-view recommended way to create a new student profile is this:

CSV File

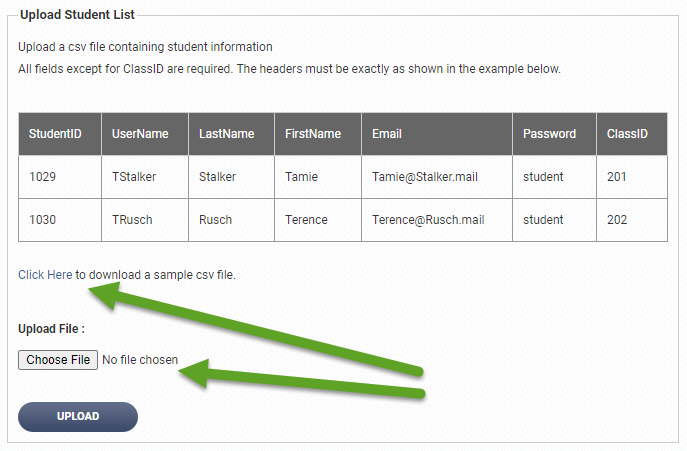
The best way to create a multiple student profiles is to by uploading a csv (=comma separated values) file created through Excel or another program.

Click on USERS in the menu bar. The screen defaults to your list of STUDENTS.  Click on +ADD.

On the right you will see information about the formatting, a place to upload your csv file and, very useful, a link to a sample csv file.We encourage you to download that file so you can use it as a temple. The spelling of the headers has to be PERFECT, no accidental spaces, incorrect cases or typos!

Advanced Tips:

Advanced Tips:

If you enter “auto”  into the Student ID field, OnlineScoreTracker will assign the first available ID starting with the value you set through Tools-Preferences-Creating Student Accounts:


If you enter “auto” into the Username field, OnlineScoreTracker will use the Student ID as the Username. A student can log into their student portal using either the Student ID or the Username. When you grade paper&pencil based tests, the bubble sheet must contain the numeric Student ID.

If you specify a password of “verify”, OnlineScoreTracker will send an email to the student asking them set a password. Click here to read more about this process.

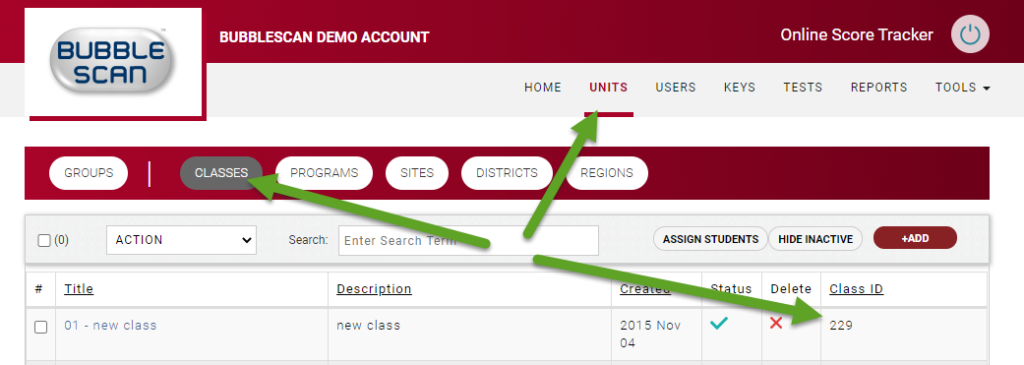
If you are organizing your students into classes, you can also include the class ID in the csv file. This will automatically place the new students into the respective class.

This means that the simplest, and from our point-of-view recommended format of a csv file looks like this:

If you want to update students that are already in your database, you can also use the csv file to do this. For more on this advanced option, read a future article on “Updating student profiles through csv”.

API

If you already have a your own website where you manage student profiles, you will probably want to create a process for your website to automatically create student profiles in OnlineScoreTracker.com. Information on how to do this is shown under Tools-Preferences in the section called “Creating Student Accounts” under “Automatic Creation of Student Accounts”. It involves a POST from your website to ours.  More about this in a future article about “Connecting to OnlineScoreTracker via API”.

Self-Registration

An increasing number of our customers are making use of our self-registration option. By following a link on your website students can create their own profile within your OnlineScoreTracker account. If you want they can also be directly assigned to a class with one or more practice tests assigned to them.

More about this feature in a future article about “Creating Student Accounts through Student Self-Registration”.

By |2020-06-06T07:54:32-06:00June 3rd, 2020|OnlineScoreTracker, Tutorial|Comments Off on Creating Student Profiles

Get Students to Set Their Own Password

Get Students to Set Their Own Password

You are about to create student profiles in your OnlineScoreTracker account and you know you want your students to access their Student Portal so they can take online tests and view their scores online.

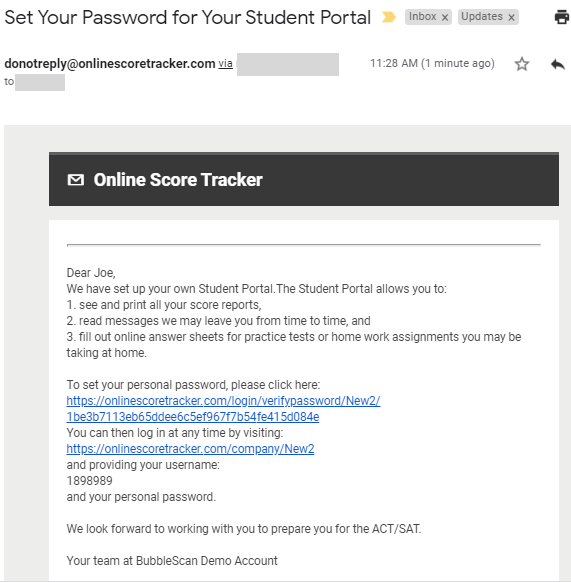
We think a slick way to communicate the necessary information to the students is to use a keyword of “verify” in the password field when you create the student profile and a customized “Set Password” email template. Our system will automatically send a personalized email to every new student along with the login details and a link to set their password. Here is how this works in detail:

1. Review and if necessary modify the email template “Set Password” – or create your own. This is the email that gets sent to the student.  To review and edit this template go to Tools – Email – Templates, then click on the Edit pencil associated with the template “Set Password”:

You can change the title of the email and any of the text. Here is what it says by default (at least at the time this post was written):

Email Title:

Welcome - please set your password

Email Message:

Dear {{firstname}}, We have set up your own Student Portal.The Student Portal allows you to:
1. see and print all your score reports,
2. read messages we may leave you from time to time, and
3. fill out online answer sheets for practice tests or home work assignments you may be taking at home.

To set your personal password, please click here:
{{set_password_url}}
You can then log in at any time by visiting:
{{url}}
and providing your username:
{{username}}
and your personal password.

We look forward to working with you to prepare you for the ACT/SAT.

Your team at {{account}}

The special codes in {{ }} are filled in by OnlineScoreTracker. Here is what the email looks like that is based on the above template.

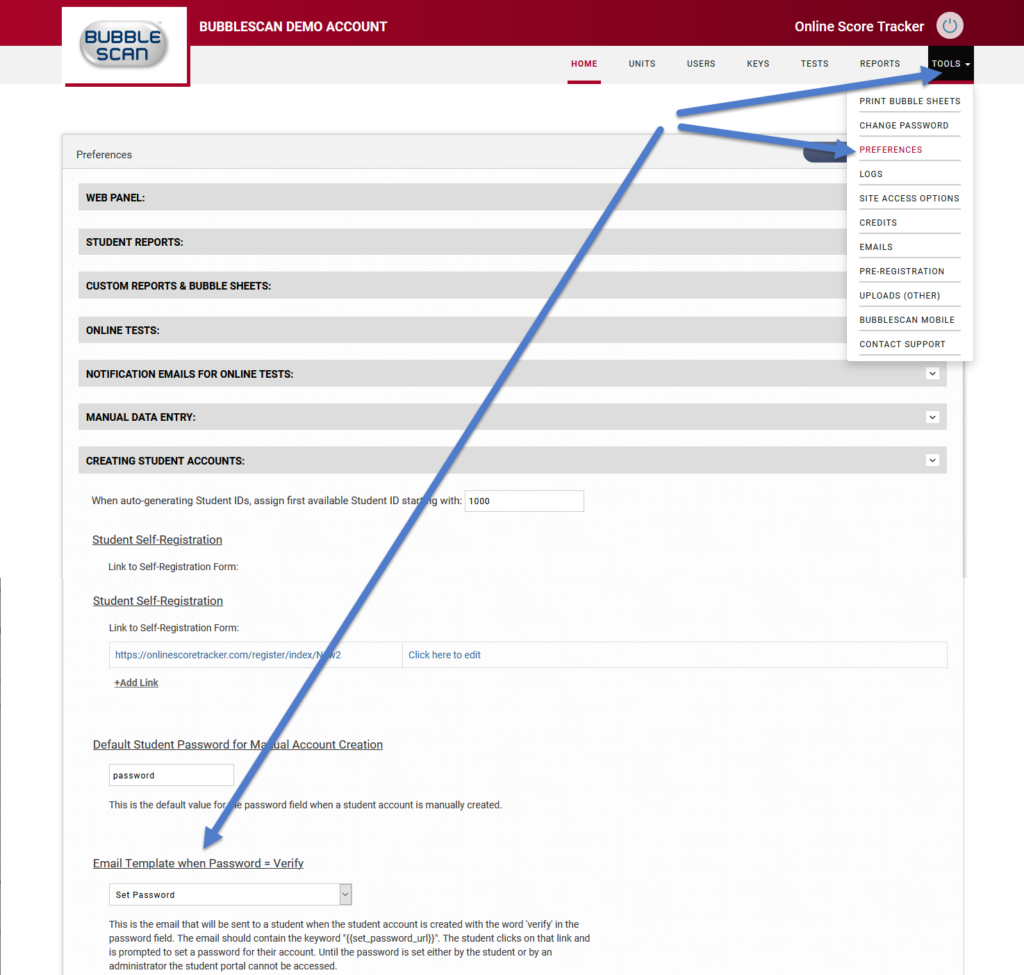
2. With your email template in place, you now want to tell our system that it should use this email template when the automatic email is sent. To do this click on Tools – Preferences and locate the section on “Creating Student Accounts” and then choose the email template for “Email Template when password = Verify”:

3. When you now add the student profile to your OnlineScoreTracker account all you need to do is specify a password of “verify”. There are three ways (manual, csv, API) for you to add student profiles and the “verify” password works the same for all three methods.

By |2020-06-03T14:25:04-06:00June 3rd, 2020|BubbleScan, Support, Tutorial|Comments Off on Get Students to Set Their Own Password
Go to Top